#ArduinoArm Project Instructions
How to build an arduino arm.
https://www.circuito.io/blog/arduino-robot-arm/ (original instructions)
Materials
-1 cm wide wood scraps, can use a 3D printer as a substitute
-1 Spring
-1 Arduino kit
-Plastic bottles for making heat shrinks (They tie things together.)
-String
-Some sort of weight for the base. A rock or potato works
Step 1: Circuits
You have to wire three servo motors to the Arduino as seen below. You have to make sure that every wire is exactly as it is shown in the picture, and shows you exactly what goes where and the names of the pieces. Then, you have to Download the code and then check to see if you wired it correctly. Open up the file, and mess around with it until it finally works. Next, you use the USB as shown in the site connected to your computer and the Arduino. Then, you have to replace the default firmware test code with the one from GitHub. Then make sure to leave Include Libraries and pin Definitions. (Note: You HAVE to set up the circuit before you run the code, or else it won’t work) 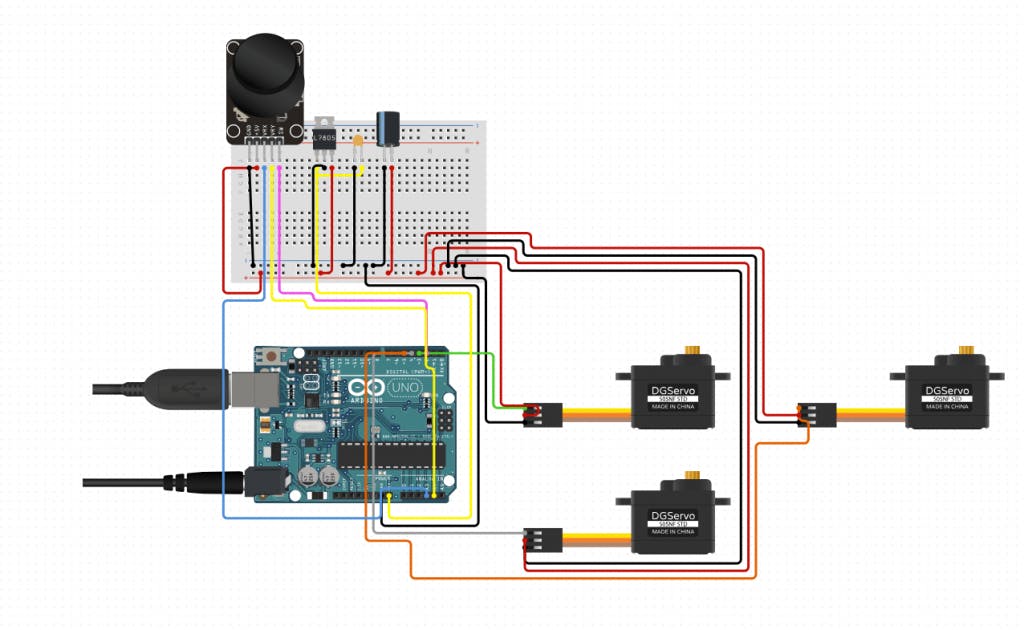
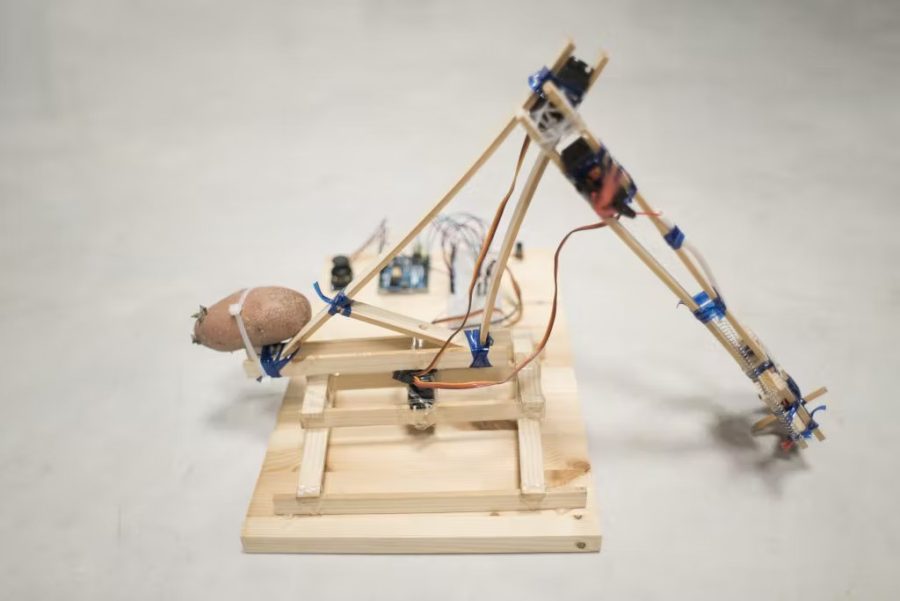
Step 2: Base
First of all, you have to create a base. The base is made with the wood scraps, bound together by the heat shrinks. The weight is used to prevent the arm from tipping over and you can zip tie it or glue it to the base. Without the weight, it would tip over. You can also just 3D print the base, and make it more sturdy. Then, you have to place the three servos at the base, arm, and gripper.
Step 3: Arm
Build the arm with the wood scraps and heat shrinks (Made from plastic bottles, and can hold stuff together.), and place a servo motor at the top so the arm can move up and down. Make sure it is sturdy enough and is balanced enough to not topple over. More counterweights might be necessary. The three servo placements are at the base, on top of the arm, and one to control the gripper.
Step 4: Claw
One side of the gripper is stationary, and one side moves with the help of a servo connected by string in some sort of tube. There is also a spring attached that can help open and close it.
Step 5: Troubleshoot
Common problems:
Error: Cannot compile for board
Fix: go to tools, and change the board to “Arduino Uno”
Error: Error occurred while uploading
Fix: Try again, and don’t touch the board
You can also try changing the port to see if that helps.
Related Stories:
This project:
https://www.circuito.io/blog/arduino-robot-arm/
https://create.arduino.cc/projecthub/circuito-io-team/robotic-arm-from-recycled-materials-7e318a
Similar projects:
https://www.hexbug.com/robotic-arm-instructions-737.html
https://zortrax.com/downloads/ROBOTIC_MANUAL.pdf
https://www.instructables.com/MeArm-Robot-Arm-Your-Robot-V10/
Take action: