Using Ultimaker Cura
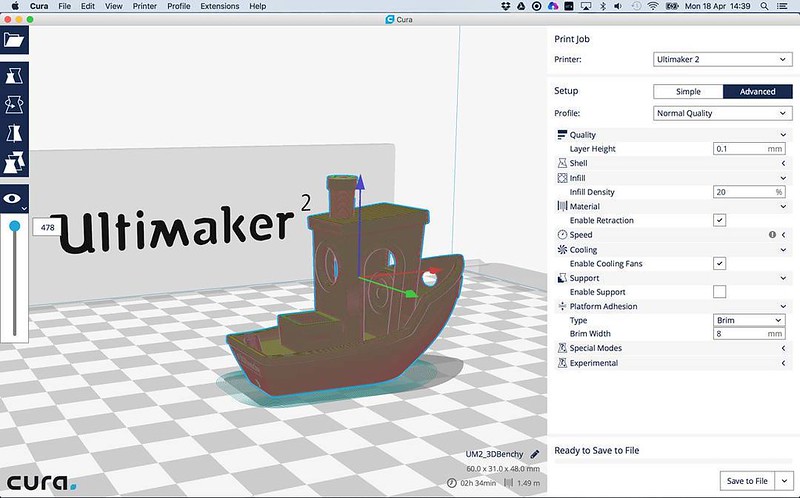
“#3DBenchy sliced in the new @Ultimaker #Cura 2.1.0 #slicer #3Dprinting #slicing #3dprinter #ultimaker @3DBenchy” by #3DBenchy is marked with CC BY 2.0. To view the terms, visit https://creativecommons.org/licenses/by/2.0/?ref=openverse
This article is about using the software Ultimaker Cura to slice 3D prints for you 3D printer.
Ultimaker Cura is a software that takes files from a 3D design program (.stl), and converts them into instructions a 3D printer can read. (.gcode)
- To start you will need to install Ultimaker Cura on your computer at https://ultimaker.com/software/ultimaker-cura.
- Now, you will need to set it up. Just follow the prompts on screen (you may need to create an account) and choose your 3D printers model and company. You will also need to have a .stl file, you can get it from an online website like Thingiverse or you can make it yourself with any 3D design program, it doesn’t matter.
- Next, Import the file with the button in the top left.
- At this point you will need to pick whatever filament you bought, PLA is a good base material and PVA is a good support material because it dissolves if left in water.
- In the same menu, there is an option for print cores. AA print cores are for PLA and BB print cores are for PVA, and AA cores are usually in slot one and BB cores in slot 2.
- To the right of that menu, there is a menu for other options. The only really important ones are infill 20% (this changes how much the product will be filled in, you will never need very much and it saves filament), and supports ON using nozzle 2.
- Once you have done all that, you are ready to slice and download the file! To do this, first push the button in the bottom right that says “slice”. Next, get a USB thumb drive and plug it into your computer. where it used to say slice, there will now be a button to download the sliced file to your thumb drive. Click it, and then plug the thumb drive into your 3D printer. From there you have to follow your printer’s operation instructions, and you will have your very own 3D print!
RELATED STORIES
https://support.ultimaker.com/hc/en-us/articles/360011467740-How-to-start-a-print-on-the-Ultimaker-3
https://eriecounty-pa.libguides.com/c.php?g=1068517&p=8211008
https://pick3dprinter.com/cura-ultimaker-tutorial/
https://www.youtube.com/watch?v=NsGOoi3677M)
TAKE ACTION