Arduino Uno R3 Elegoo Controlling A Servo Motor With A Joystick Project
Today I will be making the arduino uno r3 elegoo controlling a servo motor with a joystick project. The materials you will need for this project are 3 breadboard jumper wires, 3 female-to-male dupont wires, a joystick, a servo motor, a uno R3 controller board, and a USB cable. The directions for this project will be located below so you can follow along.
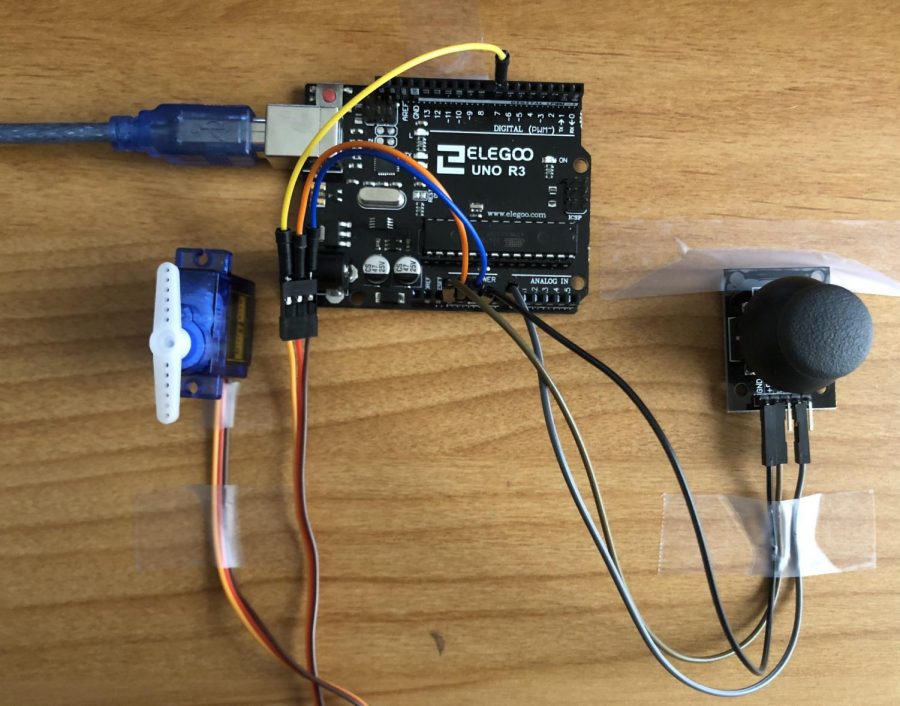
Step 1: Get your first breadboard jumper wire and connect one end to pin “7” on the uno R3 controller board, and connect the other end of the wire to the orange wire on the servo motor.
Step 2: Get your second breadboard jumper wire and connect one end to pin “5V” on the uno R3 controller board, and connect the other end of the wire to the red wire on the servo motor.
Step 3: Get your third breadboard jumper wire and connect one end to the “GND (Ground)” pin on the uno R3 controller board, and connect the other end of the wire to the brown wire on the servo motor.
Step 4: Now get your first female-to-male dupont wire and connect one end to the “GND(Ground)” pin on the uno R3 controller board, and connect the other end of the wire to the joysticks “GND(Ground)” pin.
Step 5: Get your second female-to-male dupont wire and connect one end to the “3.3V” pin on the uno R3 controller board, and connect the other end of the wire to pin “+5V” on the joystick.
Step 6: Get your third female-to-male dupont wire and connect one end to the “A0” pin on the uno R3 controller board, and connect the other end of the wire to pin “VRy” on the joystick.
Step 7: Now connect your uno R3 controller board to your computer with the USB cable and instal the code (The code is located below).
Now that you are finished with installing the code your “arduino uno r3 elegoo controlling a servo motor with a joystick” project should work when you move the joystick from side to side.
Code for project –
#include <Servo.h>
const int Y_pin = A0; // analog pin connected to Y output
Servo myservo;
int val;
void setup() {
myservo.attach(7);
}
void loop() {
val = analogRead(Y_pin);
val = map(val, 0, 1023, 0, 180);
myservo.write(val);
delay(15);
}