Elegoo Arduino Uno R3 -Thermometer Project

Source: CC search
https://search.creativecommons.org/photos/65342ca7-3987-43cf-a7cd-9ac8addea10d
How to Set up a DHT11 temperature module with Elegoo Arduino Super Starter Kit:
Materials needed (all the materials come in the package of Elegoo Arduino Super Starter Kit):
Elegoo Uno R3 Controller Board (1x)
Female to Male DuPont wires (3x) (substitutable for 3x jumper wires instead)
Jumper Wires (15x)
LCD1602 Module (1x)
220 ohm resistor (1x)
Breadboard Expansion Board (1x)
10k Potentiometer (1x)
USB cable (1x)
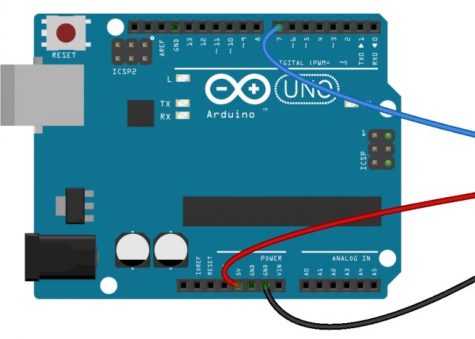
Step 1: Wiring using the Female to Male DuPont Wires (FM wires)
The wiring and installment of the DHT11 temperature sensor is very easy using FM wires, and a little big harder using jumper wires. For this step, we need 3 FM wires, one of which should have the wire strip inserted into the “7” on the Digital PWM side, another in the GND on the Power side (opposite to the “7”), and the last one that should be in the 3.5V a couple pins up from GND.
Yours should look like this (color does not matter):
Now, we can go ahead and connect the wires coming from “7” (the blue wire in this picture) to the left most wire coming from the DHT11. Even though this picture shows the red wire coming from 5V, we are using 3.5V, because we will use the 5V slot later. Attached the red wire in this picture (connected to 3.5V) to the middle wire coming from the DHT11, and then finally, attach the black wire (in this picture) coming from the GND to the rightmost wire of the DHT11. Your view of the DHT11 should look like this: 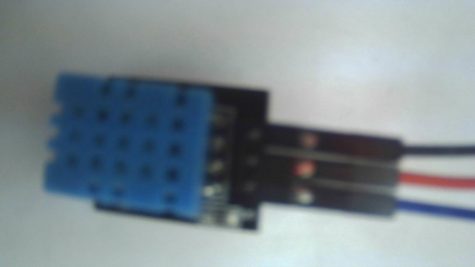
Required Additions
Before the DHT11 works, you will have to install a new library to the Arduino app. Use this link to download the DHT11 Library. Once you have downloaded it, open up Arduino IDE, then press Sketch, at the top of the screen–>Include Library–>Add .ZIP library–>select DHTLib.zip file.
Using the DHT11
Once you have finished downloading the library, you can test out your DHT11 by entering this code:
#include <dht.h>
dht DHT;
#define DHT11_PIN 7
void setup(){
Serial.begin(9600);
}
void loop(){
int chk = DHT.read11(DHT11_PIN);
delay(3000);
Serial.print(“Temperature = “);
Serial.println(DHT.temperature);
Serial.print(“Humidity = “);
Serial.println(DHT.humidity);
delay(2000);
}
This code does the following: When plugged into a computer with the Arduino app open, it will make temperature and humidity readings, which it will display on the serial monitor. You can access the serial monitor by pressing Ctrl+Shift+M while in the Arduino app.
Using an LCD screen
To connect an LCD screen to Arduino, check out these pages:
- Elegoo Arduino Uno R3 – How to Setup An LCD -by Seth Job, on our very own Jackson Journal
- (this one is slightly less accurate, because our potentiometers are different) Arduino LCD Set Up and Programming Guide (circuitbasics.com)
When using #2, remember that our potentiometer is different, because it has 2 connection points in the front, and one in the back. The others has all 3 connection points in the front. My set up of my potentiometer looked like this: 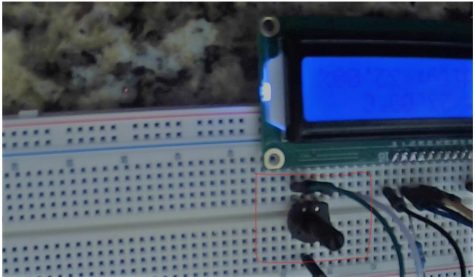
The potentiometer now has 2 wires connecting it at the front, and one in the back, just like we needed!
Once you have set up the LCD and made sure it works, you can enter this code:
#include <dht.h>
#include <LiquidCrystal.h>
LiquidCrystal lcd(12, 11, 5, 4, 3, 2);
dht DHT;
#define DHT11_PIN 7
void setup(){
lcd.begin(16, 2);
}
void loop(){
int chk = DHT.read11(DHT11_PIN);
delay(3000);
lcd.setCursor(0,0);
lcd.print(“Temp: “);
lcd.print(DHT.temperature);
lcd.print((char)223);
lcd.print(“C”);
lcd.setCursor(0,1);
lcd.print(“Humidity: “);
lcd.print(DHT.humidity);
lcd.print(“%”);
delay(2000);
}
This code is the one that will make temperature readings and display it on the Arduino LCD!
That’s all there is to it!
Here are some related articles to check out, either if you have a different Elegoo/Arduino kit, or for troubleshooting:
How to Set Up the DHT11 Humidity Sensor on an Arduino (circuitbasics.com)
How to Use DHT11 Sensor Using Arduino : 5 Steps – Instructables
How to use the DHT11 with Arduino | Code, Circuit Diagram … (techzeero.com)